
How to Connect Two Routers to Create a Single Network [Step-by-Step Guide]
Are you experiencing Wi-Fi dead zones in your home or office? A single Wi-Fi router often fails to cover larger spaces, multiple rooms, or multi-story buildings. While adding a second router seems like an obvious fix, an improper setup can create two separate networks (subnets). This can cause frustrating issues like dropped connections, printers not discovered, or file-sharing failures between devices.
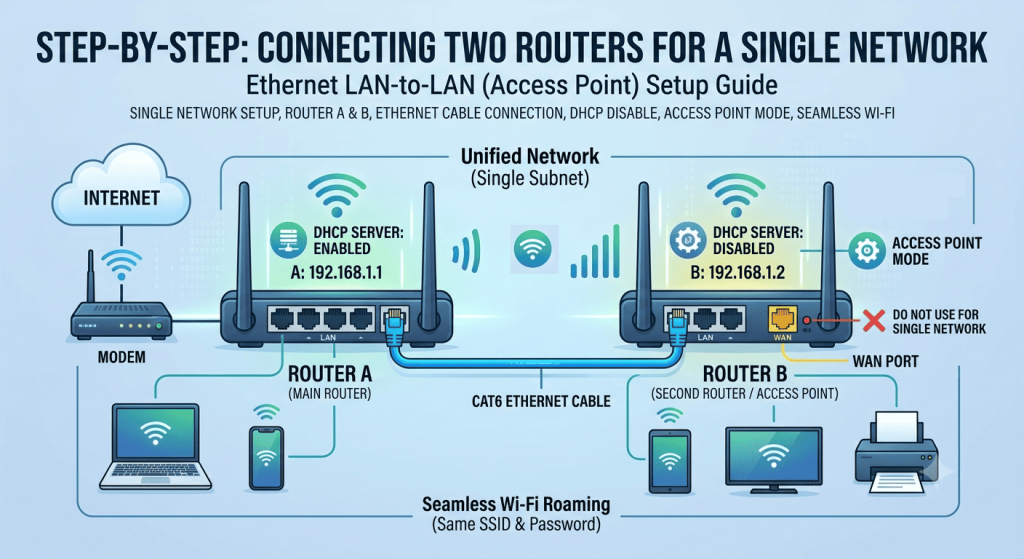
In this guide, you will learn how to connect Router A (Main Router) to Router B via an Ethernet cable to create one seamless, single network (Same Subnet).
1. Why Should You Setup a Single Network?
When both routers operate on the same local IP network:
- Seamless Roaming: You can use the same Wi-Fi Name (SSID) and Password across both routers so your devices switch automatically without dropping connection.
- Easy Device Communication: Devices connected to Router A (like a PC) can easily communicate with devices on Router B (like a Smart TV or wireless printer).
- No IP Conflicts: Eliminates Double NAT issues, ensuring stable internet speeds and better online gaming or streaming performance.
2. Two Methods to Connect Router A to Router B
Depending on the features available on your second router (Router B), choose one of the two methods below:
Method 1: Using Access Point (AP) Mode (Recommended)
Most modern dual-band or Wi-Fi 5 / Wi-Fi 6 routers (TP-Link, D-Link, Netgear, Asus) have a built-in Access Point Mode.
Step-by-Step Setup:
- Access Router B Settings: Connect your laptop or smartphone to Router B (via Wi-Fi or Ethernet cable) and log in to its admin page (usually
192.168.0.1or192.168.1.1). - Enable Access Point Mode: Go to Advanced > Operation Mode (or Working Mode), select Access Point Mode, and save the settings. The router will restart. (Enabling AP Mode automatically disables Router B’s DHCP server).
- Connect the Cable: Plug one end of the Ethernet cable into a LAN port on Router A, and the other end into the WAN (Yellow port) or LAN port on Router B.
Method 2: Manual LAN-to-LAN Setup (For Older / Basic Routers)
If Router B does not have a dedicated AP Mode option in its settings, you can manually configure it as an Access Point.
Step-by-Step Setup:
- Change Router B’s IP Address: Log in to Router B’s admin panel. Go to LAN Settings and change its IP address to match Router A’s subnet, but outside Router A’s DHCP pool.
(Example: If Router A is192.168.1.1, set Router B to192.168.1.2or192.168.1.250). - Disable DHCP Server on Router B: Go to DHCP Settings on Router B and Turn OFF / Disable DHCP.
Crucial Step: This ensures Router A remains the only device managing and assigning IP addresses across the network. - Configure Wi-Fi Settings (Optional): Match Router B’s Wi-Fi Name (SSID) and Password with Router A for seamless roaming. Set different wireless channels (e.g., Channel 1 for Router A and Channel 6 or 11 for Router B) to prevent interference.
- Connect Ethernet Cable:
Note: Connect the Ethernet cable from a LAN port on Router A to a LAN port on Router B. Do NOT use the WAN port on Router B in this manual method.
3. Which Port Should You Use on Router B? (WAN vs. LAN Port)
A common point of confusion is whether to plug the incoming cable into the yellow WAN port or a LAN port on Router B:
- Use the WAN (Yellow) Port: ONLY if you have enabled Access Point (AP) Mode in Router B’s firmware settings. AP Mode reconfigures the WAN port to behave like a standard LAN port, saving you an extra LAN slot.
- Use a LAN Port: If you are performing a Manual LAN-to-LAN Setup (DHCP disabled manually). Plugging into the WAN port without AP Mode will cause Router B to create a separate sub-network.
4. Understanding Router Modes: Quick Comparison
Different operation modes define how a router handles incoming internet traffic and routes it to connected devices:
| Operation Mode | Internet Source | Creates New Network? | DHCP Server Status | Ideal Use Case |
| Router Mode | ISP Cable (Modem) | Yes | On (Active) | Default mode for primary internet setup. |
| Access Point (AP) Mode | Ethernet Cable from Router A | No (Single Subnet) | Off (Disabled) | Extending Wi-Fi range via wired connection without speed loss. |
| Range Extender / Repeater | Wireless (Wi-Fi) from Router A | No (Single Subnet) | Off (Disabled) | Boosting Wi-Fi signal where running cables is not possible. |
| WISP Mode | Wireless (Wi-Fi) from External Source | Yes (Isolated Subnet) | On (Active) | Creating a secure private network from a public/shared Wi-Fi. |
Conclusion
Connecting two routers via Ethernet cable using Access Point Mode or a Manual LAN-to-LAN setup is the most reliable way to extend your network coverage without losing bandwidth or speed. Just remember the core rule: only one router (Router A) should have its DHCP server active so that all devices stay on a single, unified network.